| 1. | |

| |
Grab a few blank CDs or DVDs, write down the URL to this tutorial, get in your car, drive to your nearest Apple store (preferably not during peak hours), and park yourself in front of one of their speedier Macs, such as an aluminum-enclosure, 12-core Xeon Mac Pro. (If you happen to already have a Mac, you can skip this step. And no, a Mac Pro is not required; any Mac made after 2002 will probably work if it has a few gigs of free hard drive space and at least OS X 10.4.)
Congratulations! You’ve just completed the hardest step in this tutorial; everything else is amazingly
easy.
|
|
| 2. | |

| |
Download SWTSG v1.2.3 and install it on the Mac. Once it’s installed, launch it!
(Note: It’s probably a good idea to Quit any apps that might be running on the Mac Pro, especially processor-hungry video players that might be playing massive, HD, demo movies.) (Note: Due to my recent update of Xcode, and a recompile necessitated by the Fox letter at the bottom of this page, version 1.2.3 requires OS X 10.6 and 64-bit.)
|
|
| 3. | |
In the control window, enter the name of your fictional distributor and a tagline of distributor info. The image preview window will show how
your distributor logo will appear.


|
| 4. | |
Enter the name of your fictional film company and a “limited liability” tag. The image window will show a preview.


Note that this is just a simple, green silhouette of the logo — when you generate the whole sequence, it will look better.
|
| 5. | |
Enter your intro text that will appear just before the big text crawl. The image window will show an image that looks like this:


|
| 6. | |
Enter your title logo. The image window will then show this. (Note: In the final render, there will be stars in the background of
this title logo — this preview image does not show them.)


|
| 7. | |
Enter your crawl text. The image window will then show this. (Note: In the final render, there will be stars in the background of
this text crawl — this preview image does not show them.)


Any single-row paragraph will be automatically centered, and if it is also in all upper-case, it will be vertically stretched to about twice the normal line height. This is
useful for starting your text with something like this:
Episode THX
A NEW NAME
(If you want to manually control the positioning of the text, you can do it by putting any number of spaces at the beginning of the line.)
|
| 8. | |
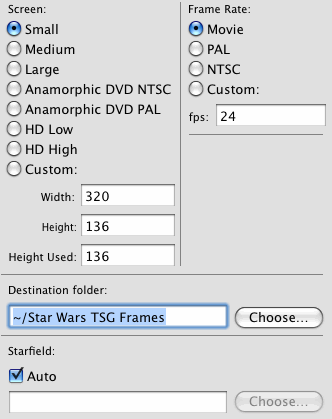
Click over to the “Generate” tab, and select your movie’s pixel dimensions, frame rate, destination folder, and starfield option. (If you are using the SECAM system, choose the PAL options which are identical — mes excuses.)

Note that the default folder, “Star Wars TSG Frames” does not exist, and you will need to manually create it.
If you choose “Auto,” a starfield will be automatically generated for the Title and Crawl parts of the sequence. Otherwise, you will need to choose a starfield image. In the current version of the app, this image should be the same size as your chosen “Width” and “Height Used.” (If it is not, it will be scaled, but only by a crude, nearest-pixel scaling method.)
Question: I chose an “Anamorphic DVD” resolution, but the image is letterboxed. Aren’t anamorphic widescreen DVDs supposed to be without letterboxing in their images?
Answer: Not necessarily. See this page to understand why.
|
| 9. | |

| |
Click the “Go” button. Your sequence will now generate. This may take a while, so you might want to hide the app (Cmd-H)
and go find a Starbucks. (But first tell a store employee that you’re running a long render, so maybe they
won’t stop it while you’re gone.)
|
|
| 10. | |

| |
Your sequence is now a very large number of individual BMP files, each showing one frame of video. This is not the best format to work with,
so let’s turn it into a single, reasonably small QuickTime file which can be imported into any movie-editing package and converted into whatever your
movie’s final format needs to be.
Click the QuickTime logo in the dock, close its advertising window that appears, choose File > Open Image Sequence (not Open File), then select the
first frame (frame number zero) from your destination folder. You will also be prompted for a frame rate — be sure to choose the exact same frame
rate that you chose in the SWTSG app. After what might be a long pause with no progress bar (be patient!), your sequence will now open in a QuickTime video player window.
At this point, you might be able to actually play back your BMP files in real time, if the images are small enough and the Mac is fast enough, but don’t
bother with that yet — instead, choose File > Export to save your sequence as a single, QuickTime movie file (i.e. an .mov file).
|
|
Warning: Do not use File > Save As! That works too, but makes an enormous file. Using Export allows you to use a good codec and choose a compression rate and other settings.
|
|
| |
The compression settings will probably be defaulted to the H.264 codec with high image quality. That’s what we want; just go ahead and render it with those settings.
(Note: If you’re doing this at home, and you don’t have QT Pro, you will need to use another app, such as iMovie, to render your sequence as an .mov file. That can be done as described here by Karl Petersen. Or use this very nice tutorial by Duncan MacIver, that completely replaces this step 10 of my tutorial. Or, if you use Matlab, try this simple technique. Or try this image-to-movie processor sent to me by Rich Louie.)
(Note: If you are running Snow Leopard, you will find that QuickTime X does not support Open Image Sequence — and there’s no “Pro” version to buy, either! However, QT7 can be found in the Utilities folder, so you should still be able to use Open Image Sequence with it — although I’ve received reports that QT7 can crash when attempting to use large image sequences in Snow Leopard. Hopefully all this will be fixed when some future version of QuickTime X brings back support for image sequences.)
|
|
| 11. | |

| |
Now just burn the .mov file to a blank CD or DVD, like so: (a) Insert blank disc and wait for it to appear on the desktop; (b) drag the .mov file to it; (c) open the blank disc’s window, then click the Burn button.
|
|
That’s it! Hope you enjoy it, and don’t hesitate to send me 